Corny Keg Carbonating Instructions
By Steve Bader
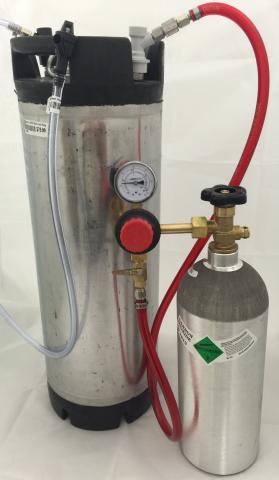
Are you tired of cleaning, sanitizing, filling and storing bottles? The solution is using a 5 gallon “corny” keg system. Corny is the nickname for the company “Cornelius” that sold the 5 gallon stainless steel kegs to the soda industry for years. Pepsi-Cola uses ball lock kegs, and they are the most common and most popular for homebrewers. Coca-Cola uses pin lock kegs, which are less common and typically less desirable since they do not have a pressure relief valve on the lid of the keg. This article is geared toward ball lock kegs. These instructions do work for pin lock kegs also, you just have to use the gas inlet as your pressure relief valve.
These corny kegs are the solution for any beverage that you want to carbonate, as they are easy to use and very durable. The kegs most commonly come in the 5 gallon size, which is perfect for the US homebrewer, as that is the most common size we brew beer in. The ball lock corny kegs have an easy to open lid with a pressure relief valve, which then gives you easy access to the inside of the keg for cleaning. With one Co2 Cylinder and regulator, you can then hook up to 6 kegs with the appropriate splitters.
The typical home setup is to have one Co2 cylinder and regulator in a standard size kitchen refrigerator, hooked up to 2, 3 or 4 of the 5 gallon corny kegs. You then have the option of putting faucets through the door of your refrigerator, or having a hand held faucet on the end of a hose dangling inside the fridge. You need 28” of clearance to fit the ball lock corny kegs and hoses.
First step: Clean and sanitize your keg
Just like everything else in homebrewing, you must clean and sanitize your keg and the hoses that the beer comes in contact with. Clean with a percarbonate cleaner, PBW, Straight A, or One Step. Fill the keg with a solution of about 3 gallons warm water and 3 Tablespoons of one of the above cleaners. Put the lid on the keg, hook up to your Co2, and us the pressure to run a little of the solution out through your faucet to fill your outlet lines. Shake up the keg to get some of the solution on all of the interior surfaces. Let the keg set for about 30 minutes for the cleaner to do its work. For really stubborn stains an overnight soak is even better. (NEVER use chlorine bleach on your keg, because chlorine bleach can pit and damage stainless steel)
This is also a great time to check your keg for air leaks. Hook up your keg and your gas inlet, turn the pressure on to 10-12 lbs, and then apply soapy water to all connections, looking for soap bubbles that indicate a leaking keg. Tighten any leaking fittings, or replace worn gaskets. If you have no bubbles, your keg should work wonderfully. After your keg is clean, empty the cleaning solution, and rinse with warm water.
Now sanitize your keg by filling it with about 3 gallons of water and 2 teaspoons of Iodophor. Hook it up to your Co2 line, and again use the pressure to push some sanitizing solution out through the faucet line. Let the sanitizing solution sit in your keg for about 10 minutes to sanitize your keg and the dispensing lines. Then empty the keg and let it drip dry for a minute or 2.
Siphon your beer (cider wine, or soda) into keg, refrigerate beer to under 45 degrees. It will take about 12 hours to cool beer from 65 to 45 degrees.
I’m thirsty, I want to drink my beer now!
Here is the “quick” method (and most common) of carbonation, which allows you to carbonate your beer in around 10 minutes. Hook up your Co2 line to the inlet valve on your keg. To adjust the pressure, turn the screw in the center of the main body clockwise to increase pressure, and counter clock wise to decrease pressure. Turn your regulator up to 20 lbs. With the keg upright, fill the keg with Co2 for about 5 seconds, then bleed off excess air (oxygen) by pulling the pressure relieve valve on top to purge the oxygen out of the keg. Repeat this step 4 times to ensure all oxygen is out of keg.
Now set keg on its side, with Co2 still hooked up to 20 lbs and the Co2 valve open into the keg. Rock the keg back and forth with the Co2 inlet on the bottom, for 7-8 minutes. (Rock for 20 seconds, rest for 5 seconds, rock for 20 seconds, etc.) Now stand the keg upright, lower the pressure to 10-12 psi, and shake for about 30 seconds more. Pull the pressure relief valve to release any excess pressure. Hook up the fill hose, and dispense some into a glass to sample! Your beer will be carbonated now, but it may be a bit foamy for the next 24 hours, but it will settle down as time goes on. If you rock the keg for longer than the recommended time, you may over carbonate the beer, so be sure to time yourself to avoid over carbonation.
For every glass of beer you dispense, you will need to have Co2 injected to replace the volume of beer. Keep your Co2 line hooked up at all times, and it is up to you if you want to have the valve open from the Co2 bottle or close it after each night of drinking to prevent Co2 loss.
Let your carbonated beer settle with the Co2 still hooked up, for about 24 to 48 hours. Sample some as you get thirsty!
I don’t want to drink my beer right now, I am patient!
Yea, right, and I have some ocean view property in North Dakota I will sell you! If you truly are not in a hurry to drink your beer, you can simply hook the beer up to your Co2 at 10-12 lbs of pressure, bleed the head space 3 times, and then sit back and wait about a week for the beer to slowly absorb the Co2, and be ready to drink. The beer must be under 50º for this to work.
I want to “naturally” carbonate my beer.
If you want to carbonate your beer with fermenting yeast and sugar, that is also possible. For this method, you add 1/3 of a cup of corn sugar (not ¾ of a cup like filling small bottles) to the beer, seal the lid with about 20 lbs of pressure from your tank, unhook the Co2, and then let the yeast ferment the corn sugar and also carbonate the beer at the same time. This will take approximately 1 week at 70º. Be sure that the lid is tightly sealed at the beginning of this process. You could also use about ½ cup of dry malt extract in place of the corn sugar if you want to follow the German purity laws.
Dispensing your beer.
Once your beer is carbonated, things should work pretty well. Most home dispensing situations are in a small refrigerator, with short dispensing lines. For these situations, 10 to 12 lbs of pressure should give you adequately carbonated beer. Temperature makes a difference. Most Micro-Brew is carbonated to about 2.5 volumes of Co2. At 40º this is 10-12 psi; at 45º this is 13-15 psi. If you have longer lines, you have to increase the dispensing pressure to compensate for the pressure loss of the long hose length. The regulator can tend to “drift” the pressure up or down a few pounds over the course of a few weeks, so be sure to occasionally check the pressure.
I want to bottle a few beers out of my keg!
If you want to bottle the beer from the keg efficiently, cool your bottles to as close to 30º as possible. Sanitize them, and then put a plastic bag over the top with a rubber band prior to putting them in the fridge. To fill the bottles, turn the pressure on the regulator to about 3 to 4 psi. Bleed off the headspace Co2. Then fill you bottles trying to splash as little as possible. You could put a short hose on your dispenser to reach the bottom of the bottle. Dispensing at a low pressure on your regulator is very important here. Seal your bottles as soon as they are full to capture the maximum amount of Co2. You will lose some Co2 in the transfer process, so this is not a good way to “age” beer, as there is normally a small amount of oxidation that happens in the transfer. If you drink the beer in the next week or so, it probably will be fine.
I want to take beer to a friend’s house for a party.
It is inconvenient to take a keg and your Co2 bottle to a friend’s house for a party. Plus they may drink all of your beer! This is where the “Carbonator Cap” comes to the rescue. The cap fits on top of a 2 liter plastic soda bottle (the equivalent of a 6-pack), and then connects to your ball lock gas fitting. Here is how it works. Fill the 2 liter bottle with your beer, and let the foam subside. Then put the carbonator cap on tightly. Push down on the spring loaded center valve, and squeeze the bottle to purge the air out of the bottle. Then hook the Co2 ball lock fitting to the top of the 2 liter bottle and fill the head space with Co2. This will keep your beer properly carbonated for weeks, so it is perfect for taking beer on road trips or camping.
Beer line pressure loss:
For every foot of length of your 3/16” beer line coming out of your keg, there is a pressure drop of 2.20 PSI due to the restriction of the hose. This is the most common size beer line hose used in a home environment. That means for every 4 foot of hose, there is a 8.8 PSI drop in pressure when the beer gets to the faucet (and your beer glass). If you have less pressure coming out of your regulator, you WILL have foaming problems! Remember this when you are setting up your kegging system. Longer hoses will require higher pressures to dispense properly
Larger diameter hoses have less pressure loss, and are commonly used in long lengths of hose in commercial environments. In these cases, a long line of hose is used for the majority of the distance, with a short line of 3/16” connected at the end of the run.
For every foot of ¼” hose there is a pressure drop of .65 PSI per foot, and for every foot of 5/16” hose there is a pressure drop of 0.4 PSI per foot.
Jockey Boxes.
In outdoor settings and parties, often a “jockey box” is used. This is a cooler that will hold ice, and typically has an aluminum “cold plate” with beer line inside the cold plate, that cools the beer. This helps to dispense beer at cool temperatures when a refrigerator is not available. With a cold plate, your beer can be up to about 55°, and dispense at closer to 40° after the beer travels through the cold plate. An alternative is a long coil of stainless steel tubing that is inside the cooler. These are more expensive, but will work a bit better if the temperature of your beer is above 55°. Regardless of which type of Jockey box you use, you typically need to turn the regulator pressure up to over 25 lbs. to avoid foaming. The beer line pressure loss from the above paragraph is at work here, so the length of the tubing inside the jockey box or cold plate determine this pressure necessary to dispense properly. You will probably need to experiment with the pressure necessary to properly pour your beer.
Kegging tips:
- Your beer MUST be cold to absorb Co2. Under 50º will work, but cooler is better for absorbing Co2. You cannot carbonate beer above about 55º
- Contrary to popular belief, foaming is caused by low Co2 pressure, not by high Co2 pressure. Most foaming is a result of your Co2 regulator being set under 8 lbs of pressure. Occasionally it is also caused by a partial blockage of the outlet hose or connectors.
- Your Co2 bottle volume is measured by weight, not by pressure gauges. The 5 lb. aluminum Co2 bottles weigh approximately 7.5 lbs empty, and thus around 12.5 lbs full. Steel bottles are heavier. If your bottle has T.W. stamped on the neck with a number beside it, that is the empty (Tare) weight of your bottle.
- There are single gauge and double gauge regulators. The second gauge measures pressure in your Co2 bottle, not volume. Temperatures determine pressure, thus making the pressure gauge somewhat useless for you to determine Co2 volume in the tank in 5 lb Co2 bottles. A bottle that is nearly full will show 1500 lbs at 70º, and 500lbs at 40º, which suggests that you refill the tank when it is nearly full.
- Gaskets need to be replaced periodically.
- Hoses that have had Root beer or Sarsaparilla normally absorb the soda flavor, and cannot be used for beer after they have absorbed the soda flavors. Most other soda flavors do not taint the hoses nearly as much.
- A 5 lb. Co2 bottle will normally carbonate and dispense approximately 40-50 gallons of beer (8-10 kegs). If you only get a few kegs and your bottle is empty, you probably have a leak, and need to do the soapy water trick.
- Co2 bottles must be pressure tested every 5 years. There is a date stamped on your Co2 bottle with it’s last test date. It looks like 8@00 (August of 2000), or 10@03 (October of 2003) If your date is older than 5 years, the bottle cannot be refilled until it is retested and restamped. We have an exchange program where we trade you for another used tank that has been re-tested and stamped with a current date, for a nominal fee.
- Used 3 gallon corny kegs are very rare, and thus when we do have them, they are very expensive.
- “Nitro” beers require a Co2 bottle filled with “beer gas” (75% Nitrogen-25% Co2), and a “Beergas" or "stout spout" faucet to properly be dispensed. The Intertap faucets have a "stout spout" nozzle that can be attached when you are pouring Nitro beers. We sell this "beer gas" for $109.99 for a full used tank (same size as 5 lb Co2), and exchanges for $39.99
Article Type: