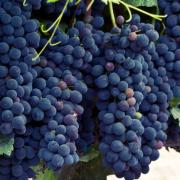
Every year we have new customers come into the store who have access to grapes growing on their property and want to make wine for the first time with them. The first question is always, which type of grape you have growing in your yard? One non-scientific way is by the size of the grapes you have. Table grapes are what you buy in the grocery store, and wine grapes are typically smaller grapes, about the half the size of table grapes.
A more accurate way to determine what kind of grapes you have is to measure the sugar level and the acid levels of the grapes when they are ready to be picked. Ripe grapes intended for wine making will have a sugar level (when measured with a hydrometer) of about 1.085-1.090 (brix of about 21-22), and table grapes have a sugar level of about 1.050-1.060 (brix of about 14-15). Acid levels of wine grapes are about .70 to .80 on the titration scale when tested with an acid test kit. Table grapes are much higher in acid, with tests in the 1.2 to 2.0 range.
Please note that the grape crop will vary each year depending on the growing conditions, and of course when you pick the grapes. If you pick the grapes early the sugar levels will be lower, and the acid levels will be higher than ripe grapes. If you pick the grapes when they are over ripe, the sugar levels can be higher, and the acid levels lower. Normally the birds, deer, and other animals will eat them before they get overripe. My experience in Clark County (Washington) is that Concord grapes normally ripen around the middle of September. But this can vary by as much as 2 weeks in either direction. Grapes you picked a week apart can have significantly different acid and sugar levels, thus, for you to make consistently good wine, you need to measure acid and sugar levels for each batch of wine you make.
Concord grapes are a “slip skinned” grape, meaning that the skins slide off easily, making the grapes a bit harder to press. And the flavor of the skins is often described as “foxy”. While “foxy” is difficult to describe, it is not a normal “wine” flavor, and when fermented it can give the wine a strong chemical taste that is a bit woody. Note this flavor is not apparent when eating the Concord grape, since the flavor is released during fermentation. Thus, it is a good idea to press the juice from the skins before adding the yeast to your wine.
The bottom line on concord grapes. They are too high in acid and too low in sugar to make a good wine without the winemaker adjusting the wine to accommodate for these differences. You will need to dilute the grapes with water to reduce the acid level, and then add sugar to bring your hydrometer reading up to about 1.080 to 1.085 to get the correct alcohol level. And due to the “foxy” nature of the skins, I recommend separating the skins from the grapes before adding the yeast. If you want to make a “white” concord wine out of the red skinned grape, simply press the juice and separate the skins immediately. (The red color is from the skin, not the pulp). To make a blush or light red wine, mix the hot water and crushed grapes, then when cooled to around 100° F. add the pectic enzyme. Press the juice out after about 2 hours. The longer the skins are in contact with the grape juice, the darker the color and the greater the “foxiness” flavor. The compromise here is that you will not get a deep red color by separating the skins from the grape juice within the first 24 hours (instead of 3 to 7 days), but you will reduce the “foxiness” flavor of the wine.
5 Gallon Recipe
Sanitation is very important. All equipment used in making wine should be sanitized before using it. I suggest making a solution of 4 teaspoons potassium metabisulfite and ½ gallon of water and use it to sanitize all your equipment. (store it in a glass jug between uses) This high concentration of solution requires that you soak or spray the solution on your equipment for 5 minutes, and you can drain and then begin using the equipment. You do not want or need to rinse the equipment after the sulfite solution. It is assumed in these directions that all the equipment that you will use will be sanitized before you put it in contact with your wine.
- Pick your grapes, throw away the under ripe grapes. Rinse the grapes, then remove the stems, and crush the grapes to expose the juice. (You may want to put your crushed grapes in nylon bags to make it easier to squeeze out the juice later today, or rent a press, if doing large batches). Add 2 gallons of hot tap water (about 130°), stir the water in the grapes to mix well, and then add the pectic enzyme, yeast nutrient, and potassium metabisulfite. Top off the wine with warm water to about the 6 ½ - gallon mark on your fermenter.
- Add the corn sugar to the wine about 1 pound at a time, stirring between each addition to dissolve the sugar. Measure your sugar level of the juice (juice only, no pulp), being careful not to go above 1.085. The amount of sugar you need may vary from the recipe based on the ripeness of your grapes.
- Record your hydrometer reading here. Original Hydrometer reading: __________
- This is necessary when you want to know alcohol content. It should be about 1.075 to 1.085. Avoid sugar readings above 1.085, since higher alcohol contents will hide many of the desirable fruit flavors.
- Put the lid on the bucket with the airlock filled with sanitizing solution and let the Potassium metabisulfite sanitize the wine. The Potassium metabisulfite produces a gas called Sulfur Dioxide. It may smell unpleasant, don’t worry. This gas is normal and will dissipate in about 24 hours. The Sulfur Dioxide will destroy wild yeast and bacteria in your wine in the next 12 to 18 hours, while it will not be harmful to your packaged wine yeast added later. (The Potassium Bisulfite will also inhibit enzymatic browning of white wines, promotes clarity and extends the shelf life) The wine yeast will be added approximately 24 hours later
- About 2 hours later, press the juice to remove the grape skins. The pressed skins are excellent composting material. The wine is called “must” at this point. If you have an acid test kit at home, test your wine and adjust it accordingly at this point. You need an acid test reading of about .60 to .80. You add acid blend if too low, and potassium bicarbonate to lower acidity. (We will test the acid for you at the store for free!! Just bring us about an 8-ounce sample after the must has been completely mixed) You will lose volume when you remove the skins, giving you about 5.5 gallons of volume at this time.
- Approximately 24 hours after you have added the Potassium Bisulfite, you may then add the yeast. Cut one corner of the yeast package and sprinkle the yeast onto the top of your wine and allow the yeast to slowly absorb moisture and adjust to the grape juice. You should not stir the yeast into the wine. Now tightly place the lid on the bucket with the airlock full of the sanitizing solution. Keep the temperature of your must about 70º to 75º during the fermentation.
- Fermentation should start in 24 to 48 hours. You can verify that the fermentation is started by looking for foam production on top of the must, or gas bubbles coming out of the airlock (if the lid is tightly sealed). If you have a loose lid type of fermenter you can open the lid, and in a quiet room actually hear the Co2 escaping much like Co2 coming out of a freshly poured can of soda in a glass. If your fermentation has not started within 48 hours, please call us at the store.
- Let the wine ferment for about 5-7 days. Then siphon the wine into a sanitized glass carboy. This separates the sediment from the wine. The purpose of this first racking (transferring the wine into a different container is called racking) and all other racking is to separate the sediment from the wine, since the sediment can cause some off flavors, and of course causes cloudiness.
- Let the wine ferment for about another 10 - 15 days. The fermentation should slow during this time to a near stop. When you have about ¾ of an inch of sediment, it is time to rack a second time.
- Your wine should be stopped fermenting or very near stopped. (If your temperature was lower than 65º, it may take longer---but no worries) You should also see some clearing in your wine. You may take a hydrometer reading while racking to see how far the sugar level has dropped at this time. If the reading is 1.000 or below, you will want to add the 3 ¾ Teaspoon of Potassium Sorbate and 1/4 Teaspoon of Potassium Bisulfite (or 5 Campden Tablets). Try to rack your wine with a minimum of splashing from this point on. Remember that oxygen is your enemy from now until you drink your wine. The Potassium Bisulfite is added at this time as an antioxidant, to minimize browning, promote clarity and as a preservative. The Potassium Sorbate is added to prevent any additional fermentation in the bottle that would cause carbonation or to push the cork out of the bottle.
- You can determine your alcohol content now if you subtract your ending gravity from your original gravity and multiply the difference by .125 (example original gravity 1.085 – final gravity of .995 = .090. Multiply .090 X 125 = 11.25% alcohol by Volum
- Sweetness. Your wine should now resemble the taste of immature wine now! It is very common for the wine to have an ending specific gravity of .995 to 1.000. This is often too dry tasting for most people, since they would like a sweeter wine. The solution is to add sweetness back in at this time. The Potassium Sorbate you added in the previous step allows you to add more cane sugar, and not have it be fermented by the yeast. You can add boiled and cooled sugar water at this time to the level of sweetness you desire. I would start by adding about ½ pound of sugar boiled in about 2 cups of water. You can add more later if you would like. The idea here is to add a little at a time, taste the wine, and then add more if you feel it is not enough. Experience has taught me that it is best to have a friend help you tasting for sweetness. Patience is valuable here.
- Let your wine set in a quiet place to clarify. This may take a few weeks, to a few months. Time is your friend here. Just keep the wine out of direct sunlight and keep oxygen contact to a minimum. You need to “top off” your wine at this time with additional boiled and cooled water or a similar wine.
- If your wine is not clarifying as you would like it to, you can add Dualfine at this time to aid with clarity. Filtering would be optional at this point. You can filter your wine ONLY after you have allowed the wine to settle out most of the sediment.
- Once your wine is properly sweetened and clarified and the Co2 has dissipated, you should bottle it. Sanitize your bottles with the potassium metabisulfite solution (4 teaspoons potassium metabisulfite per ½ gallon of water) soak your corks in the potassium metabisulfite solution for about 5 minutes to sanitize them and make them easier to insert into the bottle. Corks come in 3 sizes. Number 7, 8 and 9. The smaller the number the smaller the cork. The general rule is larger corks for longer aging. Transfer your wine quietly, with a minimum of aeration. Fill to about ½ inch below where the cork will go in. Immediately put the cork in and stand upright for about 5 days to let the cork dry out and form a seal. Then set the bottle on its side or upside down to keep the cork moist and sealed. Age your wine as you wish and drink when you want!! Most wine will improve with age, but many factors are involved here. In general, higher alcohol levels, higher acid levels, and higher tannin levels require more aging, and taste better older.
- Store your wine about 50º to 55º if possible. Most importantly store the wine at a constant temperature. Avoid rooms that fluctuate in temperature. Also, higher humidity is also better since the cork is less likely to dry out.
- You should label your wine so that a year from now you remember what it is!! You can also put a shrink seal cover on to enhance the appearance of your wine. We have a full line of over 60 different wine labels we can overprint for you to personalize your wine. All our labels can be seen on our web site.